FEMA Logo

Label Panel and Label Edit Tools

User Guide

FEMA DFIRM Production Tools

Annotated map area


Table of Contents:

What are Label Panel and Label-Edit?
Quick Reference Guide
   Label Panel Toolbar
   Label Edit Toolbar
Tool Controls
   Label Panel Toolbar
      Label Panel button  Label Panel
   Label-Edit Toolbar Tools
      Display Label EZ Output button  Display Label Panel Output
      Change Label Status button  Change Label Status
      Change Label Properties button  Change Label Properties
      Abbreviate Label button  Abbreviate Label
      Reset Label button  Reset Label
      Highlight Feature button  Highlight Feature
      Restore Suppressed Label button  Restore Suppressed Label
      Suppress Label button  Suppress Label
      Compose Label button  Compose Label
      Decompose Label button  Decompose Label
      Make Label Horizontal button  Make Label Horizontal
      Stack Label button  Stack Label
      Duplicate Label button  Duplicate Label
      Reposition Label button  Reposition Label
      Create Leader button  Create eader
      Generate Index File button  Generate Index File
      Mask button  Mask
      Label-Edit Options button  Label-Edit Options
      Flip Label button  Flip Label
Trouble – Shooting
Contacts


What are Label Panel and Label-Edit?

Label Panel and Label-Edit are used in conjunction with one another.  Automated text generation and placement for FIRM panels will be done by Label Panel, which will account for 80% to 90% of your annotation work.  The labeling is in accordance with FEMA ’s FIRM standards, which are described in FEMA’s

Once you have completed the batch annotation of a panel, you can use Label-Edit to modify label placement, orientation, and properties.  Label-Edit also allows you to add leader lines where they are necessary.

Label Panel Toolbar
Label Panel toolbar


Label-Edit toolbar
Label-Edit toolbar


Quick Reference Guide

The following is a quick reference guide to all of the components of Label Panel and Label-Edit.

Label Panel Toolbar

Label EZ toolbar

Label Panel tool Label Panel Create annotation for the selected panel(s)


Label Edit Toolbar

Label-Edit toolbar

Display Label EZ Output tool Display Label EZ Output This tool has been disabled
Change Label Status tool Change Label Status Change status to prevent label modification if batch annotation is re-done
Change Label Properties tool Change Label Properties Convert serif to sans serif font
Abbreviate Label tool Abbreviate Label Abbreviate a selected word
Reset Label tool Reset Label Convert an abbreviated word to its long form
Highlight Feature tool Highlight Feature Highlight a feature label or a feature
Restore Suppressed Text tool Restore Suppressed Text Add suppressed labels to the map
Suppress Label tool Suppress Label Remove a label from the panel
Compose Label tool Compose Label Convert a multi-part label into one unit
Decompose Label tool Decompose Label Break a single-unit label into multiple text boxes
Make Label Horizontal button Make Label Horizontal Make a selected label horizontal
Stack Label tool Stack Label Stack a label in a specified number of rows
Duplicate Label tool Duplicate Label Duplicate an existing label
Reposition Label tool Reposition Label Move a label along a curved feature to a new position
Create Leader tool Create Leader Add a leader line
Generate Index File tool Generate Index File This tool has been disabled.
Mask button Mask This tool has been disabled.
Label-Edit Options tool Label-Edit Options Modify the options for stacking, repositioning, and leaders
Flip Label tool Flip Label Invert selected text


Tool Controls

This section describes the function of each of the tools available on the Label Panel and Label-Edit toolbars and provides instructions for their use.

Label Panel Toolbar

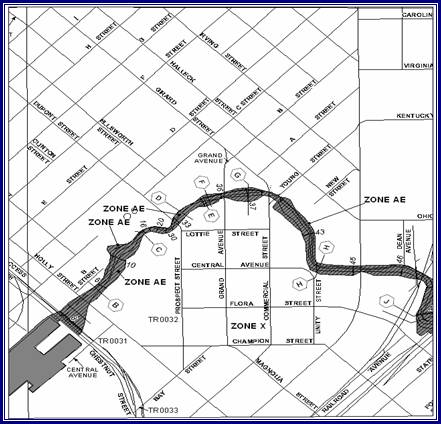
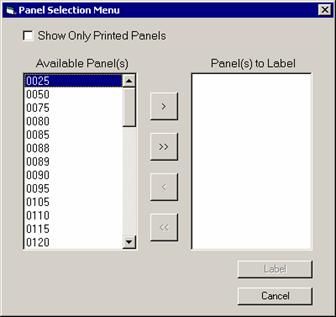
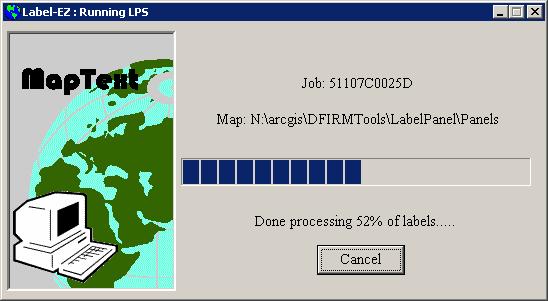
There is one tool on the Label Panel toolbar.  It allows you to select the panel(s) to be labeled and to launch the batch annotation process.  Label Panel generates annotation for each FIRM panel you select, at the scale of the panel(s) selected.   There are three annotation layers in the database: 24000, 12000, and 6000 scale.

Label Panel button  Label Panel

  1. Click on the Label Panel button.

    Panel Selection Menu

  2. Click on the check box next to Show only Printed Panels if you would like to omit the non-printed panels from the list shown in the Available Panels window.  The list from which you select panels is based on the attributes in the FIRM Panel Index layer (S_FIRM_PAN).
  3. Select the panel(s) in the Available Panels window that you would like to have batch annotated.  To select multiple panels, hold down the Ctrl key while making selections.
  4. Move the selected panel(s) to the panel(s) to Label window, using the > button.  To move all panels, click on the >> button.
  5. Use the < and << buttons to remove a selected panel or all panels from the Panel(s) to Label window.
  6. Once your selections are complete, click on Label.  Your ArcMap project will be minimized and the following process indicator dialog will appear.

    Label EZ progress indicator dialog

  7. The annotation is generated in a batch process and stored in an annotation feature class.
  8. When the annotation is complete, you will be notified by the following dialog:

    Panel Log completion dialog

  9. When you close this dialog, by clicking on the X in the top right corner, your ArcMap project will maximize again.

    Note:  You will not see the annotation once Label Panel has completed the batch process.  You must launch a workflow step in which panel annotation is edited.  Run Map Production Pro and preview the panel annotated to see the labels and leaders.

Label-Edit Toolbar Tools

The Label-Edit tools allow you to adjust the placement of labels, add leader lines, and modify label properties.  In order to view the annotation, you must launch a child job for the parent step involving editing of annotation.  Any modification of the annotation, except applying a mask, requires that you be in an edit session.

Keep in mind that if you find errors in the data, you must make edits to the dataset and re-run the batch annotation for the panel on which you are working.  Correcting annotation will not change the attribute value in the database.

Display Label EZ Output button  Display Label Panel Output

This tool has been disabled, since the annotation for each job is loaded automatically when a step involving editing of annotation is launched.

Change Label Status button  Change Label Status

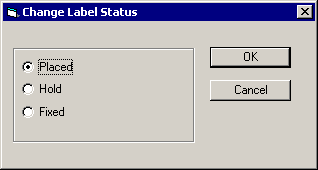
After you generate batch annotation with Label Panel, Label-Edit allows you to edit text placement and labels as necessary.  Unmodified labels have a status of “placed” whereas those that have been moved or edited have a status of “fixed. ”  These classifications are useful in the event you need to re-run Label Panel.  The “fixed” labels will not be replaced, nor will additional annotation be placed for those features that have fixed labels.  The “hold” status indicates that a label has been modified but can be moved by when batch annotation is repeated, if necessary.

  1. Start an editing session by clicking on Edit and choosing Start Editing from the menu options.
  2. Use the Select Features or Edit tool to select a label.
  3. Click on the Change Label Status tool.

    Change Label Status dialog

  4. Select the status of the label and click OK.

Change Label Properties button  Change Label Properties

This tool will allow you to modify a label’s text or font properties.

  1. Start an editing session by clicking on Edit and choosing Start Editing from the menu options.
  2. Use the Select Features or Edit tool to select a label.
  3. Click on the Change Label Properties tool.

    Text and Font Properties dialog

  4. Change the font properties (font, font style, font size, font color) of the text label you have selected.

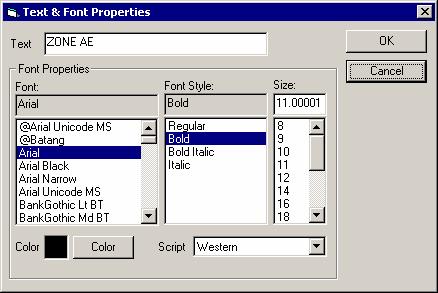
    Note:  You should ensure that any changes you make to the label properties will conform to the specifications in FEMA ’s April 2003 Guidelines and Specifications for Flood Hazard Mapping Partners Appendix K: Format and Specifications for Flood Insurance Rate Maps.

  5. Click OK when you are done.

Abbreviate Label button  Abbreviate Label

Use this tool to abbreviate a single word that appears in a label.

  1. Start an editing session by clicking on Edit and choosing Start Editing from the menu options.
  2. Use the Select Features or Edit tool to select a single word in a label.
  3. If the label has multiple words, you will receive the error message below.  Use the Decompose Label tool to break a multi-word label into separate words.

    Warning message:  Decompose the label before abbreviating a word.

  4. Click on Abbreviate Label.
  5. If the selected word is in the abbreviation dictionary, its abbreviated form will replace the selected word.

Reset Label button  Reset Label

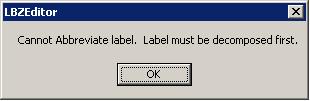
Use this tool to reverse the effect of the Abbreviate Label or the Stack Label tools on a word.

  1. Start an editing session by clicking on Edit and choosing Start Editing from the menu options.
  2. Use the Select Features or Edit tool to select a single word in a label that has been hyphenated or abbreviated.
  3. Click on Reset Label.
  4. The hyphenated or abbreviated word will revert to its original form.

Highlight Feature button  Highlight Feature

You can highlight a feature by selecting its label and vice versa.

  1. Start an editing session by clicking on Edit and choosing Start Editing from the menu options.
  2. Use the Select Features or Edit tool to select the feature with the label you want to highlight or the label for the feature that should be highlighted.
  3. Click on the Highlight Feature tool.

    Note:  If you select a feature for which the label has been suppressed, you will be prompted to restore it.

Restore Suppressed Label button  Restore Suppressed Label

Label Panel may suppress placement of labels during batch annotation due to lack of space or conflicts in label placement that require a user’s attention.  It is important that you run this command in order to determine which labels were not placed and to determine which need to be added to the panel.

  1. Start an editing session by clicking on Edit and choosing Start Editing from the menu options.
  2. Click on the Restore Suppressed Text tool.
  3. Select the feature class you would like to work on from the dropdown list.  The suppressed labels for that feature class will be shown in the Text window.

    Restore Suppressed Label dialog box

  4. Select the label that you want to restore.
  5. The data view will change, to focus on the location of the feature whose label you want to restore.  The feature will be highlighted and the label text will be placed in close proximity to it.
  6. If you would like to add the label to the layout, click Restore.
  7. Modify the label, as necessary, using the Label-Edit tools.
  8. Restore other labels for the same feature class or other feature classes.

Suppress Label button  Suppress Label

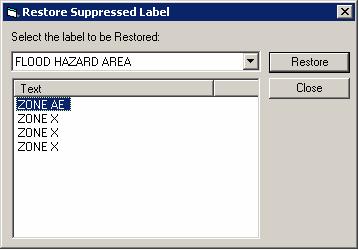
Remove labels from the panel and add them to the “suppressed label” layer (e.g., DFIRM.Anno_12000_SUP).  You can always replace these labels by using the Restore Suppressed Text tool.

  1. Start an editing session by clicking on Edit and choosing Start Editing from the menu options.
  2. Use the Select Features or Edit tool to select one or more labels.  To select multiple labels, hold down the Shift key while making selections.
  3. Click on the Suppress Label tool.
  4. All selected labels will be suppressed.
  5. Be sure to turn off the annotation layer with the “SUP” suffix to see that the selected label has been removed.  This layer holds all of the suppressed labels.

    Note:  You cannot suppress a word or a portion of a label only.  Also, any leader lines associated with a suppressed label will be deleted and must be re-created if the label is restored.

Compose Label button  Compose Label

Join a multi-part label into a single unit.

  1. Start an editing session by clicking on Edit and choosing Start Editing from the menu options.
  2. Use the Select Features or Edit tool to select a label with individual text boxes for the letters/words.
  3. Click on the Compose Label tool.
  4. All of the individual boxes will be formed into a single text box.

Decompose Label button  Decompose Label

Break a label with several words into separate text objects.

  1. Start an editing session by clicking on Edit and choosing Start Editing from the menu options.
  2. Use the Select Features or Edit tool to select a label with several words.
  3. Click on the Decompose Label tool.
  4. The single text box will be broken into multiple boxes, one for each word in the original label string.  Each of these features will have the same label number so you can use the Compose Label feature to rejoin all of the words into a multi-word label.

Make Label Horizontal button  Make Label Horizontal

Modify a label so that it is horizontal.

  1. Start an editing session by clicking on Edit and choosing Start Editing from the menu options.
  2. Use the Select Features or Edit tool to select a label.
  3. Click on the Make Label Horizontal button to re-orient the label.

Stack Label button  Stack Label

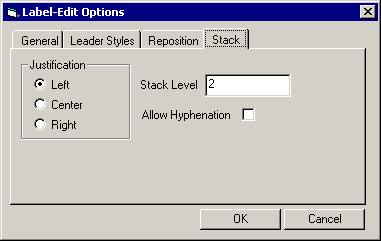
To fit long labels in narrow spaces or to fill an area, use this tool to create multi-line labels.

  1. Start an editing session by clicking on Edit and choosing Start Editing from the menu options.
  2. Check the preferences set on the Stack Options tab in the Label-Edit Options dialog.
  3. Use the Select Features or Edit tool to select the label you want to modify.
  4. Click on the Stack Label tool.

    Note:  The label will be broken-up between words for stacking, unless you have selected the “Allow Hyphenation” option on the Stack Options tab and selected the Hyphenation Dictionary to be used on the General Options tab.

  5. Modify the stacking options and re-do the stack operation, if necessary.

Duplicate Label button  Duplicate Label

Duplicate an existing label.

  1. Start an editing session by clicking on Edit and choosing Start Editing from the menu options.
  2. Use the Select Features or Edit tool to select the label you want to duplicate.
  3. Click on the Duplicate Label tool.
  4. The new label is added to the layout, just above the original.
  5. Modify the label, as necessary, using the Label-Edit tools.

Reposition Label button  Reposition Label

Adjust labels that follow curved line features using this tool.

  1. Switch to Data View, if you are in Layout View.
  2. Start an editing session by clicking on Edit and choosing Start Editing from the menu options.
  3. Use the Select Features or Edit tool to select the label you want to move.
  4. Click on the Reposition Label tool.
  5. Move your cursor over the label to be moved and click the LEFT mouse button and drag the label to its destination along the curved line.
  6. Release the mouse button to fix the label at its new location.

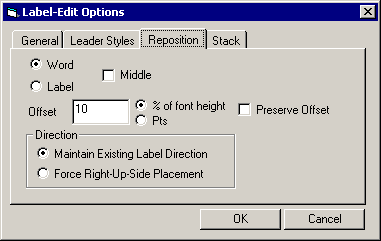
    Note:  If you have set the Options to select a single word, rather than an entire label, only the word will be repositioned.  You can change your options during the edit session, as necessary.

Create Leader button  Create Leader

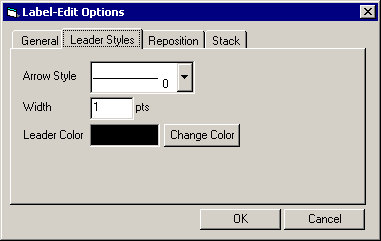
Customize the leader lines created.

  1. Start an editing session by clicking on Edit and choosing Start Editing from the menu options.
  2. Click on the Label-Edit Options button.
  3. Select the arrow style you want to use and click OK.
  4. Use the Select Features or Edit tool to select a label that requires a leader.
  5. Click on the Create Leader tool.
  6. Add the leader to the map.  Click near the label to start the sketch and end it near the feature to which it refers.  Click on the map to add a vertex to the line.
  7. Double-click to end the leader line.  The endpoint of the line will receive the arrowhead.

    Note:  You cannot change the leader properties once you have added a leader to the map.

Generate Index File button  Generate Index File

This tool has been disabled.

Mask button  Mask

This tool has been disabled.

Label-Edit Options button  Label-Edit Options

When you start your label editing session, you can set your options for features such as arrow styles, repositioning, and stacking.

  1. Start an editing session by clicking on Edit and choosing Start Editing from the menu options.
  2. Click on the Label-Edit Options button.
  3. Click on each tab in the dialog box to adjust your preferences.
    1. General Options tab:  The option to select different abbreviation or hyphenation dictionaries has been disabled.
    2. Leader Styles tab:  set the properties for the endpoint arrow style, the leader line width, and the leader color.  For guidance, see FEMA’s April 2003 Guidelines and Specifications for Flood Hazard Mapping Partners Appendix K: Format and Specifications for Flood Insurance Rate Maps.

      Label-Edit Options showing Leader Styles tab options

    3. Reposition Options tab:  set the reposition properties, including features such as selecting words or entire labels, offset from the text centerline, and text reading direction.

      Label-Edit Options showing Reposition tab options

    4. Stack Options tab:  specify the justification for stacked labels (left, center, right), the maximum number of lines to allow in a stacked label, and the use of hyphenation.

      Label-Edit Options showing Stack tab options

  4. When you have made your selections, click OK.

Flip Label button  Flip Label

Reverse the reading direction of a label.

  1. Switch to Data View, if you are in Layout View.
  2. Start an editing session by clicking on Edit and choosing Start Editing from the menu options.
  3. Click on the Label-Edit Options button.
  4. In the Reposition section of the dialog, select “Label.”  This will ensure that all text boxes belonging to a label are flipped in a single operation.  You can deselect this option if you need to control the flipping of individual components of a multi-word label.
  5. Use the Select Features or Edit tool to select a label.
  6. Click on the Flip Label tool.
  7. The reading direction of the label will be reversed.


Trouble – Shooting

Problem:  The following error message pops up when I try to change the abbreviation or hyphenation dictionary in the Label Edit Options settings.

Error message:  This operation has been cancelled due to restrictions in effect on this computer.

Solution:  Users cannot change the dictionaries used by Label-Edit.

Problem:   When using the Annotation Tools and the Label-Edit tools, sometimes the Label-Edit tool becomes greyed out (inactive).

Solution:         Stop and re-start the editing session.  This will reactivate the Label-Edit tools.

Problem:         In the previous step, I labeled a panel.  I followed the workflow process and advanced to the step where I am editing the annotation.   I just launched a new child job for the annotation editing step to see the results of the labeling process.   I see “8000” all over my panel.  None of the features in the panel have an attribute value of “8000.”

Solution:  The “8000” is a marker to indicate that an important field has not been populated.  For instance if you have not populated the “Name Type” field in the Transportation layer, the “8000” marker will appear along your road features.   In the child job, populate the empty attribute fields using the GeoPop toolbar tools, and re-label the panel.  Close the child job and advance it to a “reconcile and post” step.  Reconcile and post the edits that you made to the parent job.  Close the child job.  Once you see the JTX interface, create a new child job for the parent to which you reconciled and posted changes.  If you still see “8000” markers, you should repeat this process.


Contacts

If you need assistance with this tool, please contact the representative at your local RMC.

NAME ROLE E-MAIL PHONE
REGION I
Brent McCarthy Lead Brent.McCarthy@mapmodteam.com (336) 240-7339
Jeffrey Burm GIS/Mapping JeffBurm@mapmodteam.com (517) 482-4930 x4752
REGION II
Rich Cassin Operations Manager Rich.Cassin@mapmodteam.com (914) 333-5366
Michael Crino GIS/Mapping mcrino@mbakercorp.com (718) 482-9945
REGION III
Mike Conaboy Operations Manager mconaboy@mbakercorp.com (609) 734-7922
Lee Brancheau Senior GIS Manager lbrancheau@mbakercorp.com (609) 734-7912
REGION IV
Stephen King Operations Manager Stephen.King@mapmodteam.com (678) 459-1010
Kagan Kuyu GIS/Mapping Kagan.Kuyu@mapmodteam.com (678) 459-1041
REGION V
Sujata Banerjee Business Manager Sujata.Banerjee@mapmodteam.com (312) 575-3902
Pam Coye GIS/Mapping Pam.Coye@mapmodteam.com (312) 575-3913
REGION VI
Dan Hoecker Operations Manager Dan.Hoecker@mapmodteam.com (940) 783-4155
Phil Nguyen GIS/Mapping pxnguyen@mbakercorp.com (940) 783-4121
REGION VII
Matthew Koch Operations Manager mkoch@watershedconcepts.com (816) 502-9420 x4952
Rod Odom GIS/Mapping rodom@watershedconcepts.com (816) 502-9420 x4957
REGION VIII
David Jula Operations Manager David.Jula@mapmodteam.com (720) 514-1100
Mike Garner GIS/Mapping Mike.Garner@mapmodteam.com (720) 514-1105
REGION IX
Travis Clark Business Manager Travis.Clark@mapmodteam.com (510) 879-0950
Michael Skowronek GIS/Mapping Michael.Skowronek@mapmodteam.com (510) 879-0958
REGION X
Michael Morgan Business Manager Mike.Morgan@mapmodteam.com (206) 344-3891
Timothy Witten GIS/Mapping wittentd@bv.com (206) 344-3891